接續前一篇提到的 pytest,繼續看它的其他功能吧
fixture
fixture 幾乎可以說是 pytest 最重要的功能
前一篇的例子中只有用到準備資源的部分
這裡再舉一些例子來說明它的其他應用
準備 / 清除資源
假設我們已經有了虛構的 db 函式庫,它可以處理各種資料庫相關的功能
現在寫一個測試案例來驗證 is_connected 函式是否能正確的判斷資料庫有連線
import pytest

from db import DB


@pytest.fixture(scope="function")
def db():
    # 初始化 DB 的 instance
    _db = DB()
    # 連接到資料庫
    _db.connect()

    yield _db

    # 斷開資料庫連線
    _db.close()


def test_db_is_connected(db):
    assert db.is_connected() is True
fixture db 中不使用 return 而是使用 yield
連線資料庫後,就先將 _db instance 回傳
在 test_db_is_connected 引入 fixture db 時,資料庫會處於連線的狀態
結束後,則會執行 _db.close() 斷開資料庫的連線
(什麼時候才算結束則是看 fixture 的參數 scope,這會在後面說明)
接下來我還想要說明兩個概念
fixture中使用fixture- 用
fixture準備跟清除資源,但不直接呼叫到資源 (pytest.mark.usefixtures)
現在假設已經實作了 model,裡面有 User 的定義
我們想要驗證新增了一筆 admin 的使用者後,是否能成功查詢到這筆資料
import pytest

from db import DB
from model import User


@pytest.fixture(scope="function")
def db():
    _db = DB()
    _db.connect()

    yield

    _db.close()


@pytest.fixtures(scope="function")
def insert_admin_user(db):
    # 初始化 user
    user = User(name="admin")
    # 將 user 新增到資料庫
    db.insert(user)

    yield
    # 將 user 從資料庫移除
    db.delete(user)


@pytest.mark.usefixtures("insert_admin_user")
def test_admin_user_exists():
    # 從資料庫中找出第一筆 name 是 admin 的 user
    admin_user = User.query.filter_by(name="admin").first()
    assert admin_user is not None
新增資料前,必須先跟資料庫建立連線
因此準備資料的 fixture insert_admin_user 會使用到 db fixture
而測試函式 test_admin_user_exists ,需要已經有 admin 使用者的資料庫,來測試 User.query.filter(name="admin").first() 是否能成功取得資料
但它不需要用到 insert_admin_user 這個變數,因此就能改成使用 pytest.mark.usefixtures
這樣就能在不引入參數的情況下,使用 fixture 設定好的環境
scope
fixture 的 scope 共分為五種 (function, class, module, package, session)
表示 fixture 會在哪個階段前準備資源,並在哪個階段後清除
如果設定成 function,就會在每一個測試函式執行前和後做資源的處理
conftest.py
conftest.py 是 pytest 中的一個特殊檔案
如果是整個套件(同一個資料夾)都會用到的 fixture 就能放在這, pytest 執行時會自動載入
以下面的結構為例, test_sponsor.py 就會自動載入上層的 conftest.py 中的 fixture
└── tests
    ├── __init__.py
    ├── conftest.py
    ├── test_sponsor.py
    └── page
        ├── __init__.py
        ├── conftest.py
        └── test_title.py
常用的內建 fixture
參數化 (parameterize)
在測試資料比較簡單的時候,可以使用 parameterize 來減少撰寫重複的程式碼
@pytest.mark.parametrize(args1, arg2)- 第一個參數: 指定測試函式要使用的參數名稱
- 第二個參數: 測試資料的陣列
import pytest


@pytest.mark.parametrize(
    "x, y, expected_sum",
    (
        (1, 1, 2),
        (2, 2, 4),
        (3, 3, 6),
    ),
)
def test_add(x, y, expected_sum):
    assert x + y == expected_sum
marker
前面已經介紹過 parameterize 和 usefixtures
這裡會介紹 markers 還可以做什麼
內建 marker
自定義 marker
@pytest.mark.[any custom marker] 的用途是標記測試案例
像是如果有些測試會特別慢,就可以透過標記 @pytest.mark.slow
from time import sleep


@pytest.mark.slow
def test_super_slow_test():
    sleep(99999999999999)
執行時加上參數 -m 就能跳過(或只執行)這些案例
pipenv run pytest -m "not slow"
上面的做法,如果有測試案例不小心打成 @pytest.mark.slwo,會不太容易被發現
但 pytest 還是會正常執行
這時候可以在專案加入設定檔 pyproject.toml (pytest 6.0.0 之後才支援這種設定檔格式) 定義 marker
p.s. 不建議使用 setup.cfg 做為 pytest 的設定檔 (Read More 👉 deprecate setup.cfg support #3523)
[tool.pytest.ini_options]
minversion = "6.0"
markers = [
    "slow"
]
並在執行時加上 --strict-markers 參數
pipenv run pytest --strict-markers -m "not slow"
pytest 就會告訴我們 slwo 並不是被定義過的 maker
更進一步可以把 --strict-markers 直接寫入 pyproject.toml
[tool.pytest.ini_options]
minversion = "6.0"
addopts = "--strict-markers"
markers = [
    "slow"
]
測試例外事件
透過 pytest.raise 確認測試案例是否有符合預期的丟出例外事件
import pytest


def test_index_error():
    some_list = []
    with pytest.raises(IndexError):
        print(some_list[1])
pytest 常用命令列參數
-v(-vv,-vvv): 顯示更多資訊 (越多 v 就會顯示越多資訊)--durations=N: 只列出最慢的 N 個測試-x(--exitfirst): 遇到第一個失敗就終止測試--maxfail=num: 失敗次數達到 num 次,直接終止測試--lf(--last-failed): 只測試上次失敗的案例--ff(--failed-first): 從上次失敗的案例開始測試--nf--new-first: 從新的案例開始測試-k EXPRESSION: 只測試名稱符合 "EXPRESSION" 的案例-m MARKEXPR: 只測試有 "MARKEXPR" maker 的案例--fixtures: 列出所有fixtures
pytest-cov 測試覆蓋率
pytest-cov 可以用來產生測試覆蓋率的報告,讓我們知道程式碼還有哪些沒被測試到
# 安裝 pytest-cov
pipenv install pytest-cov --dev
e.g.,
# 計算 myproj 的覆蓋率
pipenv run pytest --cov=myproj tests/
比較重要的參數有
--cov=[SOURCE]: 測試包含的程式碼範圍--cov-report=TYPE: 測試覆蓋率報告的種類 (term, term-missing, annotate, html, xml)--cov-fail-under=MIN: 如果覆蓋率小於 MIN 則跳出
其中 --cov, --cov-report 都可以加入多個參數
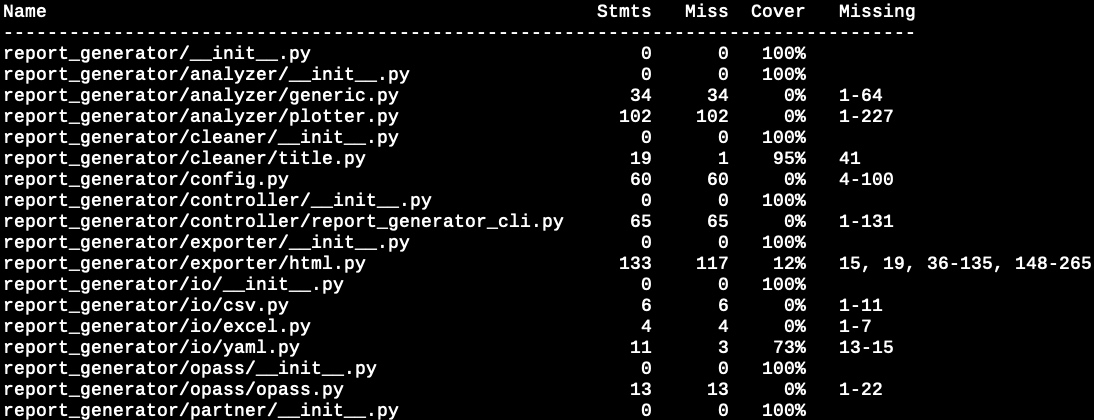
回到 pycontw-postevent-report-generator 的例子
先 checkout 回 1.0.2,來測試 1.0.2 上的測試覆蓋率
pipenv run pytest --cov=report_generator --cov-report=term-missing test/
從下面的結果可以看到哪些檔案的哪些部分沒有被測試到

如果想看精美的網頁版報告,可以試試看以下的指令
報告會產生在專案資料夾下的 htmlcov
pipenv run pytest --cov=report_generator --cov-report=term-missing --cov-report=html
一些更進階的設定,可以寫入設定檔 pyproject.toml (或 .coveragerc,但語法會不太一樣)
以下是我自己使用的 pyproject.toml
[tool.coverage]
    [tool.coverage.report]
    show_missing = true
    exclude_lines = [
        # Have to re-enable the standard pragma
        'pragma: no cover',

        # Don't complain about missing debug-only code:
        'def __repr__',
        'if self\.debug',

        # Don't complain if tests don't hit defensive assertion code:
        'raise AssertionError',
        'raise NotImplementedError',

        # Don't complain if non-runnable code isn't run:
        'if 0:',
        'if __name__ == .__main__.:'
    ]
Read More 👉 Configuration reference
其他常用 plugins
- pytest-xdist
- 用平行化加速測試的執行 (
pipenv run pytest -n NUM)
- 用平行化加速測試的執行 (
- pytest-mock
- 使用 mocking 的技巧將部分不好測試的物件替換成假的物件
- 推薦參考 Demystifying the Patch Function - PyCon US 2018 (不過她不是用 pytest)
- pytest-regressions
- 將冗長的測試結果寫成檔案,每次測試都去比對跟上次產生的結果是否相同
- 尋找其他 plugins
其他測試工具
- tox
- 在各種不同版本的 Python 中做測試,幾乎是開源 Python 專案的標準工具
- nox
- 基本上跟 tox 的功能相似,不過組態設定是使用 Python
- tox 跟 nox 推薦參考 Break the Cycle: Three excellent Python tools to automate repetitive tasks - PyCon US 2019
- hypothesis
- 採用 Property-based testing,跟以往要自己產生測試資料不同,我們只需要給予資料的定義(e.g., 0 ~ 10000 之間的整數), hypothsis 會根據定義來產生隨機的資料,也因此更容易包含到極端案例
- 推薦參考 Escape from auto-manual testing with Hypothesis! (PyCon US 2019, Zac 投了 talk, sprint, tutorial, poster,很用心在推廣這套工具)
Reference
- Python Testing with pytest
- 快快樂樂成為 Coding Ninja (by pytest) - PyCon APAC 2015
- Pytest: Rapid Simple Testing - Swiss Python Summit 2016
- Demystifying the Patch Function - PyCon US 2018
- Escape from auto-manual testing with Hypothesis!
- Break the Cycle: Three excellent Python tools to automate repetitive tasks - PyCon US 2019

