
最近因為在貢獻 commitizen,開始碰到 GitHub Action
( Python 也有自己的 commitizen 了!!!)
記錄一下怎麼應用到發布部落格文章
Before GitHub Action
要發佈一個新文章,我會做兩件事
1. 將原始碼推到 GitHub 上
2. 透過原始碼產生靜態頁面,並且推到 gh-pages 這個分支上
只有第二步是必要的,但也沒不把原始碼推上去的理由
Pelican 初始化部落格時會產生 Makefile 和給 invoke 用的 tasks.py
裡面會包好如 build, publish 等常見指令
預設會透過 ghp-import 推到 GitHub Page
Working on GitHub Action
將我原本做的事整理成 GitHub Action 該做的事,就會變成這樣
1. Check out: Check Out 到這個分支
2. Set up Python: 設定 Python 環境
3. Install dependencies: 安裝 Pelican 和相關套件
4. Build and Deploy: 產生原始碼推上去
---

name: publish post

on:
  push:
    branches:
      - content

jobs:
  publish:
    runs-on: ubuntu-latest
    steps:
      - name: Check out
        uses: actions/checkout@v2
      - name: Set up Python
        uses: actions/setup-python@v1
        with:
          python-version: '3.7'
      - name: Install dependencies
        run: |
          python -m pip install pipenv
          pipenv --version
          pipenv install
      - name: Build and Deploy
        run: |
          pipenv run inv github
這份設定檔要放在專案目錄的 .github/workflows/ 下
至於要命名成什麼都可以
另外建議使用 yamllint 來檢查 yaml 語法
我遇過太多次縮排造成的錯誤了
這份設定檔大致上算直觀
- name: 這個 workflow 的名稱
- on: 在什麼情況下才要執行這個 workflow
- jobs: 要執行哪些任務,目前我只執行 publish 這件事,下面的 step 則是描述我前面說要做的事
這麼做之後,我遇到了兩個問題: submodule 跟 ghp-import
我的部落格把主題跟套件都分出去各自成一個專案
所以要建立部落格必須要把每一個 submodule 都一併 clone 下來
所幸原本 GitHub Action 就有提供 (Ref: Check-out-submodule)
加上下面這段就解決了
      - name: Checkout submodules
        shell: bash
        run: |
          auth_header="$(git config --local --get http.https://github.com/.extraheader)"
          git submodule sync --recursive
          git -c "http.extraheader=$auth_header" -c protocol.version=2 submodule update --init --force --recursive --depth=1
ghp-import 的問題則是,我沒有在上面的環境設定我的 git 資訊
他沒有權限推到 gh-pages
也可以透過把 URL 改成 https://${GITHUB_ACTOR}:${GITHUB_TOKEN}@github.com/${repo_name} 來解決
但我實在不太想再多去設定一些 credential
最後找到了 actions-gh-page
只要把靜態網頁在 GitHub 上 build 出來,再把結果透過這個 action 推到 gh-pages 即可
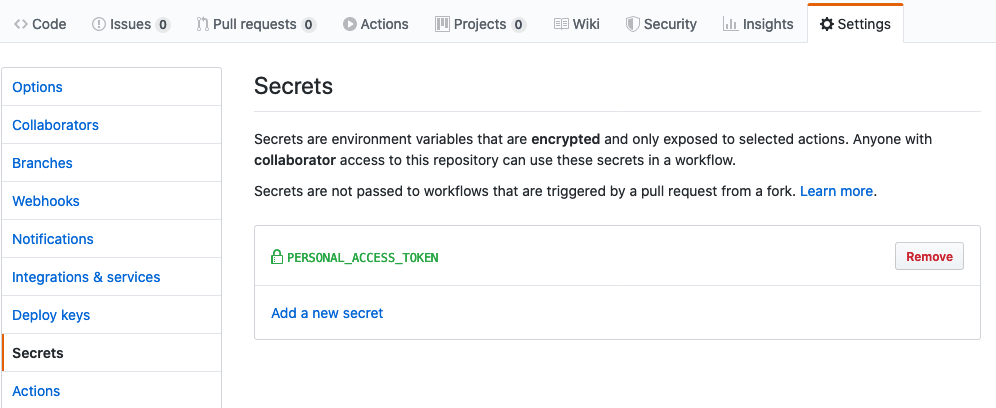
這樣我就只需要設定 {{ secrets.PERSONAL_ACCESS_TOKEN}} 這個我在其他 GitHub Action 也都用得到的 token
      - name: Deploy
        uses: peaceiris/actions-gh-pages@v2
        env:
          PERSONAL_TOKEN: ${{ secrets.PERSONAL_ACCESS_TOKEN }}
          PUBLISH_BRANCH: master
          PUBLISH_DIR: ./output
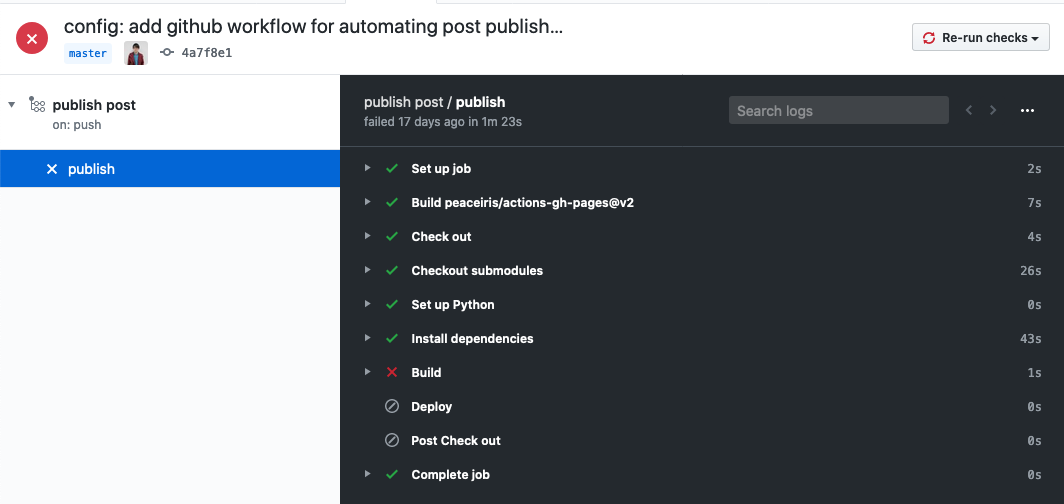
另外,最近 GitHub 終於提供可以 rerun 的選項了
原本失敗的時候還必須要 git reset 來強制 GitHub 重新執行 Action
After GitHub Action
下面就是我最後的 .github/workflows/publish.yaml
---

name: publish post

on:
  push:
    branches:
      - content

jobs:
  publish:
    runs-on: ubuntu-latest
    steps:
      - name: Check out
        uses: actions/checkout@v2
      - name: Checkout submodules
        shell: bash
        run: |
          auth_header="$(git config --local --get http.https://github.com/.extraheader)"
          git submodule sync --recursive
          git -c "http.extraheader=$auth_header" -c protocol.version=2 submodule update --init --force --recursive --depth=1
      - name: Set up Python
        uses: actions/setup-python@v1
        with:
          python-version: '3.7'
      - name: Install dependencies
        run: |
          python -m pip install pipenv
          pipenv --version
          pipenv install
      - name: Build
        run: |
          pipenv run inv publish
      - name: Deploy
        uses: peaceiris/actions-gh-pages@v2
        env:
          PERSONAL_TOKEN: ${{ secrets.PERSONAL_ACCESS_TOKEN }}
          PUBLISH_BRANCH: master
          PUBLISH_DIR: ./output